Monday, May 24, 2010

Carbo-Loading (2 of 2): Penne with Chicken and Broccoli


During the week leading up to our triathlon, which was the first Sunday in May (yes, I know I'm behind...), I tried to come up with dishes with healthy carbohydrates and lean protein.  Marshall had something similar in mind and told me he was interested in some kind of pasta dish with chicken and maybe broccoli.  Well, he just named 3 of some of my very favorite things, so it was easy to come up with a dish that would definitely satisfy.  However, my history has demonstrated that I'm not the greatest when it comes to thinking up dishes.  My sister is actually really good at just throwing things in a pot and coming up with something really yummy; my mom is the same way.  I suppose it comes from experience, but I am much more comfortable going along with a recipe.  In any case, I took on the challenge and actually came up with a really tasty pasta dish that I will try to replicate again.  I wasn't taking notes when I was cooking (I was, and still am, a horrible note-taker), so I'll do my best to explain how I made this dish.

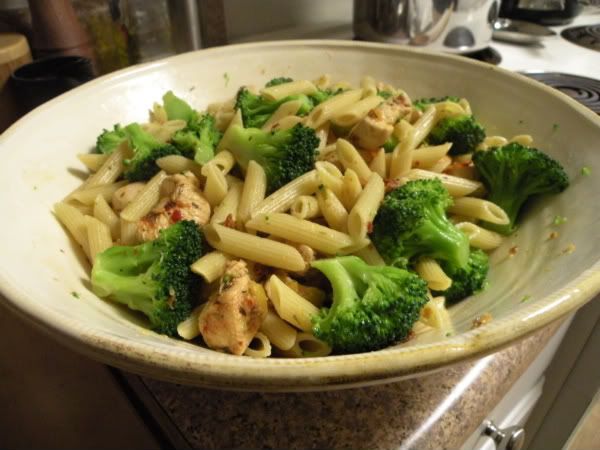
I went to the store and picked out the main ingredients:  chicken breast (2, boneless/skinless), broccoli (about 3 crowns), and a box of penne (yes, I realize I could've made an even healthier dish with whole wheat pasta, but part of me really loves that plain semolina pasta flavor).  I decided to pick up a lemon or two, thinking lemon goes great with chicken no matter what.  The rest of the ingredients I had at home:  red pepper flakes, Italian herb seasoning, and olive oil.  Oh yeah, you can't forget the cheese, but I always have cheese in the house.  The day I made this dish, I was working from home, so I took advantage of the extra time and decided to marinate the chicken.  I seasoned the chicken, which I had cut up into bite-sized pieces (about 1-2" big) with salt and pepper, then placed it in a tupperware container.  I liberally sprinkled the Italian herb seasoning (definitely the no-salt kind; I shouldn't have to tell you that) on top, then added some smashed garlic cloves.  Over-top I drizzled a liberally helping of olive oil and then took the juice of one lemon and poured that on for the final flourish.  I put on the top of the container, shook well, then placed in the fridge for about 45 minutes.  When it came to cooking the chicken, I took a very simple approach.  I heated up some olive oil in a non-stick skillet over medium heat, and added some more crushed garlic.  After about a minute, I sprinkled a healthy dose of red pepper flakes and cooked those a bit with the garlic.  Then I threw in the chicken with its juice, and cooked until opaque.  As I was prepping the broccoli, I noticed a jar in the back of our fridge.  A coworker of mine, had Marshall and I over for dinner a few weeks prior and gave us a jar of preserved Meyer lemons.  I had looked for a few recipes using it, but until then had not come up with anything to use these lemons.  Then I thought, "hmm, you know, these might work here...".  Preserved lemons have a much softer peel and Meyer lemons are known for their thin layer of pith and tender skin.  You can easily cut them up into small pieces and cook them and they're great to eat skin and all.  I did the same here:  I took a half of a preserved lemon, cut it into small pieces and threw them into the pan with the chicken.  You could replicate this flavor by adding some chopped pieces of peeled lemon or by simply sprinkling some lemon juice over the chicken while it cooks.  What came out was a delicious dish with a bright lemony flavor.  Plus, it had broccoli in it, which, in my book, is always a plus!


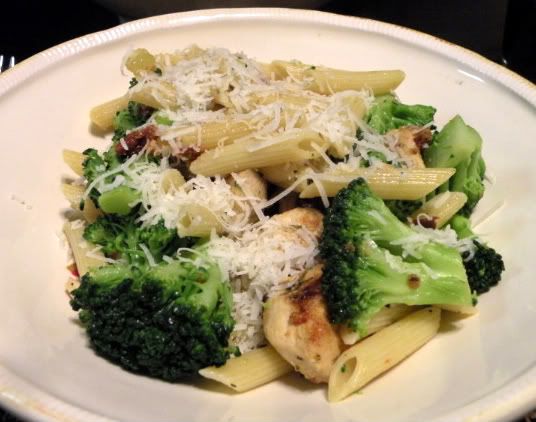
Lemony Chicken and Broccoli with Penne Pasta
Serves about 4

2 Boneless and Skinless Chicken Breasts, cut into 1"-2" pieces
6 Cloves of Garlic, crushed and divided
1-1/2 Teaspoons of Italian Seasoning
1 Lemon, juiced
2 Tablespoons of Olive Oil

1 Tablespoon of Olive Oil
1-2 Teaspoons of Red Pepper Flakes (to taste)
1/2 Preserved Meyer Lemon, cut into small pieces (optional) -OR- 1/2 Lemon, juiced
2-3 Crowns of Broccoli, cut into florettes
1/2-3/4 Pounds of Penne Pasta (or any other shape pasta you like)

1.  Add the chicken, 3 cloves of crushed garlic, Italian seasoning, lemon juice, and 2 tablespoons of olive oil into a tupperware container or bowl, mix well, and cover.  Place in the fridge for about 30-45 minutes.
2.  Start a large pot of salted water to boil.  Add the pasta.  Cook about three-quarters of the way (according to the package instructions) and add broccoli to the water.  Finish cooking pasta, in that time the broccoli should be adequately cooked, as well.  Drain well and set aside.
3.  Heat the remaining tablespoon of olive oil in a non-stick skillet over medium heat.  Add the remaining crushed garlic and cook for 1 minute.  Add red pepper flakes and sauté for an additional minute.  Add in the marinated chicken pieces, plus the marinade, into the pan and cook until opaque (roughly 10 minutes, if that). If using, add in the Meyer lemon pieces and heat through.
4.  Toss chicken with pasta and broccoli and serve with freshly grated Parmesan cheese.

bon appetit! 

Tuesday, May 11, 2010

Carbo-Loading (1 of 2): Fettuccine with Peas, Asparagus, and Pancetta

I believe I mentioned in a previous post that I absolutely loved my subscription to Gourmet and was devastated when they were shut down.  Well, as a consolation prize, they graciously offered to fulfill the rest of my subscription with Bon Appetit.  BA isn't my favorite cooking magazine.  Their issues don't contain as nearly as many recipes as G had and their food photography wasn't nearly as drool-inducing.  I mean, their food photos look plastic and unreal.  I loved that I could look at a photo of a steak on the cover of G and could actually taste it in my mouth.  With BA, it's just not the same.  Anyway, I finally got my new issue last month.  I found a recipe that caught my eye.  Marshall and I competed in a triathlon on May 2nd (it was my very first) and we needed to find something good to eat the week leading up to the event.  I figured we needed to carbo-load and this was a good start:  Fettuccine with Peas, Asparagus, and Pancetta.

What struck me most about this recipe is that it reminded me of a risotto dish Marshall and I made a couple of years ago.  It was a recipe from Ellie Krieger and it was a Primavera Risotto with asparagus and peas.  Obviously, since both recipes share ingredients they had similar flavors.  Of course, the big difference, and the one ingredient that really brought the flavor, was the pancetta.  I love pancetta.  My mom uses it as a base for her spaghetti sauce sometimes.  It's like bacon, but 100x's more flavorful.  Honestly, this pasta dish needed more.  I did enjoy the flavors of the cheese and the asparagus. I know that if I used fresh peas, they would've packed a better flavor, but frozen were the best I could find.  Overall, it was a very refreshing pasta dish, which is hard to achieve with pasta.  Honestly, I normally don't like fettuccine, because it ends up being way too heavy for me, but in this dish it really worked.  I also loved how everything looked in the serving bowl.  We definitely eat with our eyes and no matter what anyone says, how food looks on the plate is part of our overall enjoyment of the meal.

I'm not saying that this recipe has won me over for BA.  I actually am uncertain about how much more of a subscription I have left.  I highly doubt I'll see many more issues.  Fortunately, though, this means I'll have room for my new favorite:  Cook's Illustrated!


Fettuccine with Peas, Asparagus, and Pancetta
Serves 4-6

12 ounces Fettuccine or Penne
3 ounces Pancetta or Bacon, chopped
1-1/4 pounds Asparagus, trimmed and cut on the diagonal into 1-inch pieces
2 Cups Peas, shelled (or frozen - do not thaw)
1 Bunch Green Onions, thinly sliced with white and pale green pieces separated from dark green pieces
2 Garlic Cloves, pressed or minced
1/2 Cup Parmesan Cheese, freshly grated (plus more for serving)
1/2 Cup Heavy Whipping Cream
3 Tbs. Extra-Virgin Olive Oil
3 Tbs. Fresh Lemon Juice
1 Tbs. Lemon Zest, finely grated
1/4 Cup Fresh Italian Parsley, chopped
1/4 Cup Fresh Basil, thinly sliced and divided

1.  Cook pasta in a pot of boiling salted water until just tender, but still firm to bite.  Drain, while reserving 1/2 cup of the pasta cooking liquid.  Return pasta to the pot.
2.  Meanwhile, cook pancetta in a large nonstick skillet, over medium heat, until crisp.  Using a slotted spoon, transfer pancetta to paper towels to train.  Pour off all but 1 teaspoon of drippings from the skillet.  Add asparagus to skillet and sauté for 3 minutes.  Add peas, white and pale green onion pieces, and garlic; sauté until vegetables are just tender, about 2 minutes.  Remove from heat.
3.  Add vegetable mixture, 1/4 cup of the reserved pasta cooking liquid, dark green pieces of green onion, 1/2 cup of Parmesan cheese, cream, olive oil, lemon juice, lemon zest, half of the parsley and half of the basil. Toss, adding more cooking liquid by tablespoonfuls, if needed.  Season with salt and pepper.  Transfer to a large bowl.
4.  Sprinkle with pancetta, remaining parsley and basil.

bon appetit!

Recipe credit:  Bon Appetit, May 2010.

Saturday, May 8, 2010

Comfort Food: Eggs in Purgatory

First, I must confess that I have definitely slacked off on writing in this blog.  I've actually been really lax on writing in my online journal, too.  Work has blocked all blog and personal sites, which totally sucks.  Although, I find it super funny that Facebook still works.  Anyway, I haven't slacked off on ideas or cooking or taking pictures of what I have been cooking.  So, I am behind, but I promise I'll catch up.  Eventually...

My godmother gave me a waffle iron, coffee mugs, and a brunch cookbook (aptly named Brunch!) for my bridal shower gift.  First, I've always wanted a waffle iron.  I love waffles.  The cookbook was really cool, especially since Marshall and I meet with a particular group of friends each Saturday for breakfast and then once a month one of us hosts a homemade brunch/breakfast.  This time, however, I looked to it for something quick, easy and light to make for dinner one night.  I came across this dish called "Cucurumao" (pronounced "goo-ga-de-mow").  I looked at the corresponding photo and it was intriguing.  The dish is similar to one called "Eggs in Purgatory".  I was so intrigued, I picked it for dinner.  I figured it would be great with a salad and some lovely toasted Italian bread.

Essentially this dish boils down to is poached eggs in tomato sauce.  The tomato sauce for this recipe is a very simple marinara.  The "purgatory" part in the name comes from the fact that the sauce is spicy.  You put the two together and I honestly did not think it would end up being as good as it was.  It was delicious and so incredibly warming.  It was total comfort food.  My comfort food is soft, or mushy, polenta with tomato sauce and Italian sausage.  It's what I get every year at the local Italian festival.  This dish, though, is a definite close second.  It's a perfect dinner dish, too, because it is much heavier than what I would normally want for brunch or breakfast.


Cucurumao
Serves 3-4

2 Tbs. Olive Oil
1 medium-sized Onion, chopped
2 Garlic Cloves, minced
Red Pepper Flakes, to taste
1 28-ounce can Whole Tomatoes with Juice
Kosher Salt and Freshly Ground Black Pepper, to taste
4 Fresh Basil Leaves, torn
6 Large Eggs

1.  Heat the olive oil in a large sauté pan over medium heat.  Add the onions and garlic and sauté until soft and slightly golden, about 4 minutes.  Add garlic and sauté for an additional minute, until fragrant.  Finally, add the red pepper flakes and sauté for 1 minute.
2.  Add the tomatoes.  Crush them before adding them whole to the pan OR you can break them up with a spoon directly in the pan.  Chef's Note:  I place a colander over the pan and empty the contents of the can into the colander.  With my hands, I break up the whole tomatoes, removing any tough bits.  This allows the juice to drain directly into the pan.  Once the tomatoes are crushed, I simply empty the contents of the colander into the pan.  I learned this technique from my Mom.
3.  Cook until fairly thick, about 20 minutes.  Season with salt and pepper.  If you find that the sauce is too acidic, you can add a pinch of sugar at this point, as well.  I rarely find that I need the sugar.  If you don't want to use plain granulated sugar, you can simply add some shredded carrot, which will add enough balance of sweet against the tomatoes.
4.  Stir in the basil leaves.
5.  Make 6 impressions into the sauce with the back of a spoon, and break 1 egg into each depression.  Cover each egg with a little tomato sauce.  Cover the pan and cook over medium heat, until eggs are the desired doneness.  If you cook for 4 minutes, you'll get somewhere between over-medium and over-hard eggs.  If you want your eggs more runny, cook for only 3 minutes.

I served my eggs over thick pieces of toasted Italian bread.  I drizzled each side of the bread with olive oil and placed under the broiler.  You can add a little more garlic to the dish, by taking a raw garlic clove and rubbing it on the freshly toasted bread!  Of course, you can always sprinkle with cheese, but by this point I was so ready to dig in, I went without.


bon appetit!


Recipe credit:  Gand, Gayle and Christie Matheson, Gale Gand's BRUNCH! 100 Fantastic Recipes for the Weekend's Best Meal, 2009, Clarkson Potter/Publishers, New York.